
The Internet has made the world a global, interconnected village, and the content we produce should reflect this reality. Using internationalization (i18n) and localization (l10n), software developers and digital content creators can translate their content to fit different languages and cultures around the world.
For developers using JavaScript to build web applications, they have plenty of options to choose from. Popular frameworks like React, Angular, Vue, and Svelte, and even newer ones like Solid and Qwik, all have dedicated i18n libraries. In this article, however, we’ll be looking at i18n with Svelte.
What is Svelte and Svelte-i18n?
Svelte is similar to popular frameworks in terms of syntax and functionality. They share a lot of concepts in common, like components, props, and events. Svelte has a dedicated meta-framework, called Sveltekit, for building web applications. Sveltekit offers server-side rendering, routing, and offline capabilities. It’s similar to Next.js and Nuxt.js for React and Vue.
Svelte is unique compared to the other frameworks in that it’s technically a compiler and doesn’t use a virtual DOM like some of the others. After developers write code, Svelte compiles the code into JavaScript. The compilation step allows Svelte apps to be performant enough to handle reactivity and the dynamic nature of modern web applications without the complexity of a virtual DOM.
Svelte has a few dedicated i18n libraries, like Svelte-i18n, Sveltekit-i18n and Svelte-i18n-lingui. Svelte-i18n is the most mature library and can be used to localize apps built with Svelte and Sveltekit. For the rest of this article, we’ll internationalize a Svelte app with svelte-i18n, localize some parts of the app manually, and then automate the localization process with Crowdin.
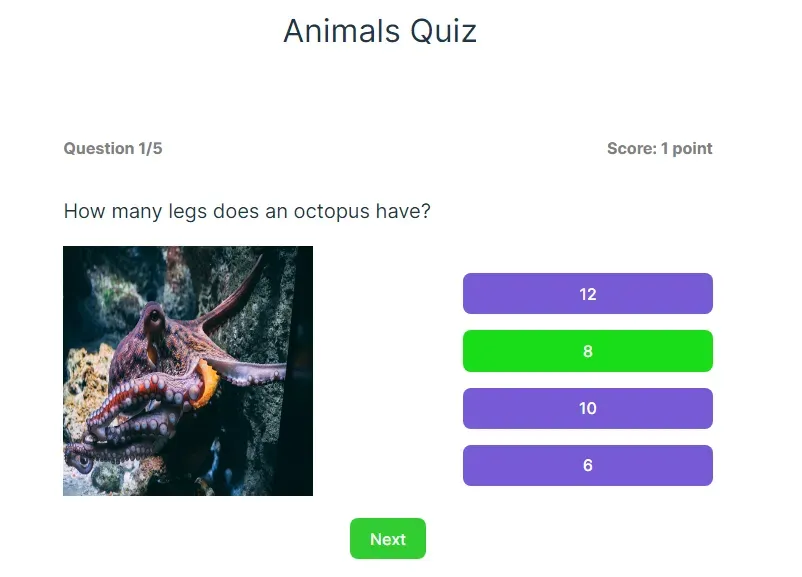
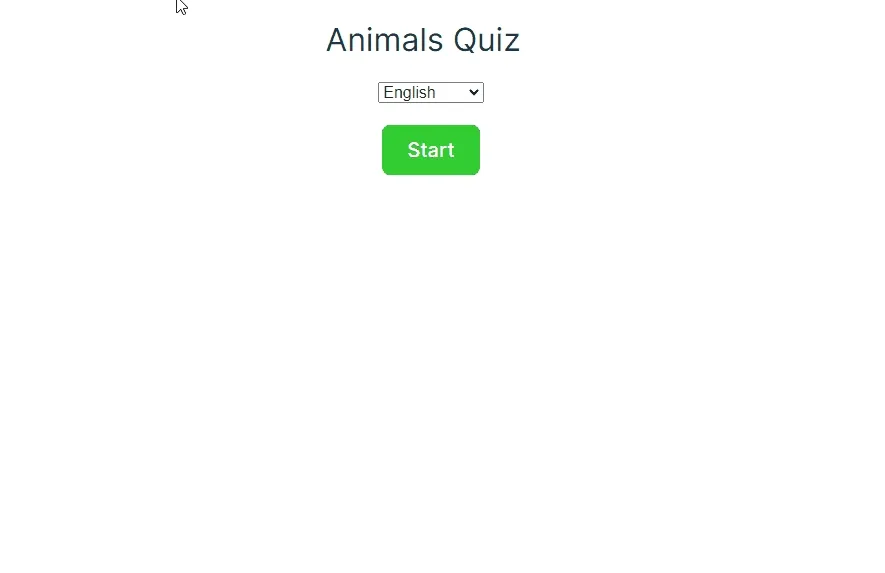
Sample App: Animal Quiz
Do you know a lot about animals? Then I think you’ll enjoy this game.
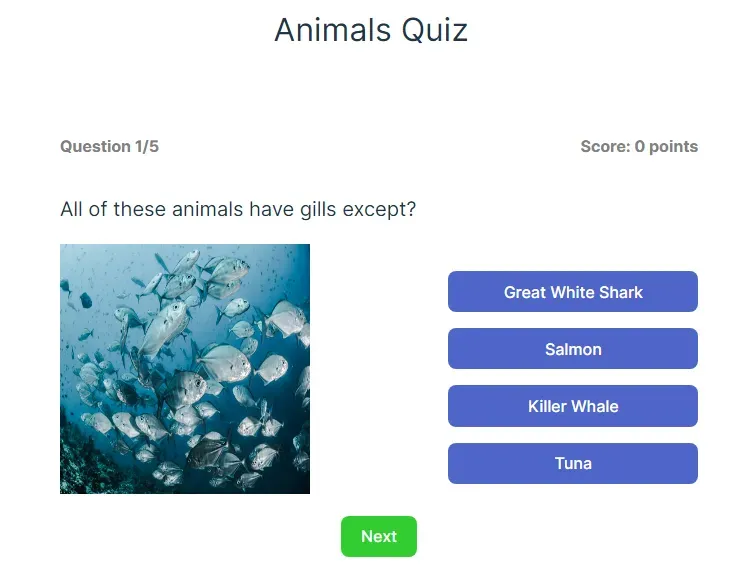
In this animal quiz, you answer five general questions about animals. Each question has four options you can choose from. If you get a question correctly, you get one point. This means you get five points in total if you answer all the questions correctly. In this article, we’ll localize the game to French.
By the way, this is not a Sveltekit application. I built this application using the Svelte boilerplate. You can find out how to create an application with the boilerplate in Svelte’s documentation. You can check the game’s GitHub repository for the complete source code. It would be much easier to follow along if you clone the repository.
Setting up Svelte-i18n
To install svelte-i18n, open your terminal and run the following command:
npm install svelte-i18nOnce the library is installed, we’ll configure it to handle all the files and locales.
Create a file src/lib/i18n.js and fill it with the following code:
import { register, init } from "svelte-i18n";
register("en", () => import("../locales/en.json"));register("fr", () => import("../locales/fr.json"));
init({  fallbackLocale: "en",  initialLocale: "en"});
Using the register() function, we’ll fetch the translation files (dictionaries) for the locales we’ll use in this app. These files don’t exist yet, and we’ll create them in a second. The important thing to note here is that register() is asynchronous, and it only loads one locale (the active locale) at a time to keep things performant. You can use the synchronous addMessage() function instead if you want.
We’ll then initialize the library with English as the initial locale. In case the user’s browser uses a locale that we didn’t specify above (Arabic, for example), the app will fall back to English.
To use svelte-i18n in the app, we’ll have to import it in the app’s entry point main.js:
import "./lib/i18n";With svelte-i18n setup, we can start localizing the app.
Translating Simple Strings
Before we can translate the strings, we’ll need to extract them using svelte-i18n. Once we extract the strings, we can include them in the locale’s dictionaries.
We’ll get started with the app’s title and the start button.

Follow these steps to translate the strings:
-
Open
App.svelteand import these variables from svelte-i18n:App.svelte import { _, isLoading } from "svelte-i18n"; -
Wrap all the markup in an
{#if}block so we can wait for svelte-i18n to load messages:{#if $isLoading}<p>Loading...</p>{:else}<header><p id="title">Animals Quiz</p></header><main>{#if gameStarted}<QuizContainer/>{:else}<button on:click={() => gameStarted = true} id="start__button">Start</button>{/if}</main>{/if}We’re using the
$isLoadingstore to only display our app after the locale has loaded. This only happens because we’re using the asynchronousregister()function. If you useaddMessages(), you won’t need$isLoading. -
Replace the string literals with i18n keys. So the header and start button text change from this:
<p id="title">Animals Quiz</p><button on:click={() => gameStarted = true} id="start__button">Start</button>To this:
<p id="title">{$_('title')}</p><button on:click={() => gameStarted = true} id="start__button">{$_('start_button')}</button>
The _ function formats strings and allows us to extract them for translation. Svelte-i18n uses the FormatJS library under the hood, so you might get the most of out of it by understanding how FormatJS works.
Now that we’ve replaced the texts with translation keys, svelte-i18n will insert the correct strings for us based on the current locale. But we’ll have to create dictionaries to use them first. We can create the dictionaries manually, but doing that is error-prone. Thankfully, svelte-i18n’s CLI tool makes this process easy.
Extracting Strings with Svelte-i18n CLI
To use svelte-i18n’s CLI, we’ll have to add the command in package.json. Add this line of code in the scripts object:
{ "scripts": { "dev": "vite", "build": "vite build", "preview": "vite preview", "extract": "svelte-i18n extract \"src/**/*.svelte\" src/locales/en.json" }}Running the extract command will search for translatable strings in .svelte files in subfolders of src (src/components in this case) and extract these strings to locales/en.json. You won’t need to manually create a locales folder; the command will do that for you.
Let’s see the command in action. Open your terminal and run:
npm run extractCheck locales/en.json and you should see the message keys:
{ "title": "", "start_button": ""}Put in the text for the title and start button:
{ "title": "Animals Quiz", "start_button": "Start"}Check the app and the strings should be the same as before.
But we want to see some French, so we’ll have to create a dictionary for it.
To localize the strings to French, follow these steps:
-
Create
fr.jsonin thelocalesfolder. -
Fill in the message keys and their translations:
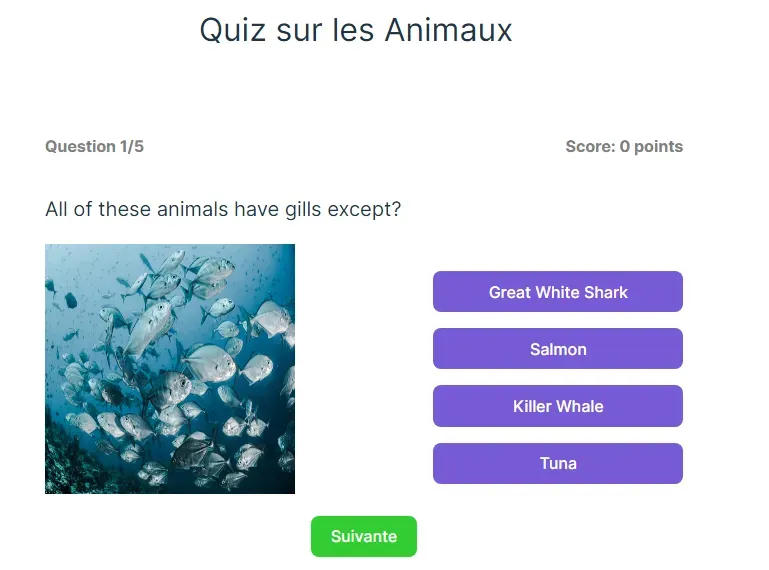
{"title": "Quiz sur les animaux","start_button": "Commencer"} -
Change the initial locale to French in
i18n.js:init({fallbackLocale: "en",initialLocale: "fr"});
Congratulations! You just localized your first strings using svelte-i18n following these steps:
- Marked strings for translation
- Extracted strings using the CLI.
- Created a dictionary for another locale and translated the strings.
Let’s look at translating more complex strings.
Localizing Strings Containing Variables
We’ll translate the text on the “Next” button and the question counter.
-
Open
components/QuizContainer.svelteand import the_function:import { _ } from "svelte-i18n"; -
Take note of the next button and question strings. We’re going to replace them with translation keys.
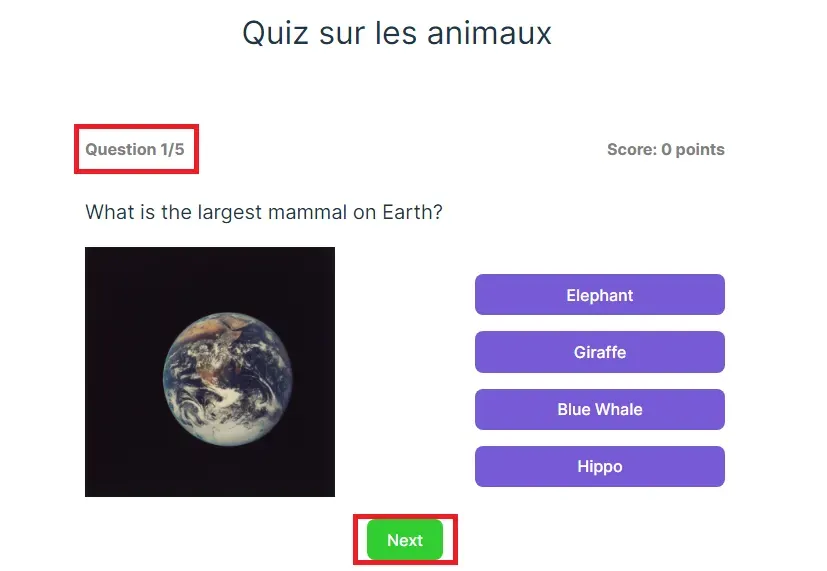
<p>Question {currentQuestions}/{NUMBER_OF_QUESTIONS}</p>// ... other code{#if currentQuestion < NUMBER_OF_QUESTIONS}<button on:click={gotoNextQuestion} id="next__button">Next</button>{/if} -
Replace the Question counter and the next button strings with translation keys:
<p>{$_('question_counter',{values: {current_question: currentQuestion,number_of_questions: NUMBER_OF_QUESTIONS}})}</p>// ... other code{#if currentQuestion < NUMBER_OF_QUESTIONS}<button on:click={gotoNextQuestion} id="next__button">{$_('next_button')}</button>{/if}Notice the
question_counterkey. The_function takes an extra parameter where we can pass variables. In this case, we pass the variablescurrentQuestionandNUMBER_OF_QUESTIONSto thevaluesobject, and we’ll use the keyscurrent_questionandnumber_of_questionsto reference the values in the translation file. -
Run the
extractcommand. -
Open the
en.jsonfile to see the new strings:{"title": "Animals Quiz","start_button": "Start","question_counter": "","next_button": ""} -
Fill in the strings:
{"title": "Animals Quiz","start_button": "Start","question_counter": "Question {current_question}/{number_of_questions}","next_button": "Next"} -
Add the new keys in
fr.jsonand fill in the translations:{"title": "Quiz sur les animaux","start_button": "Commencer","question_counter": "Question {current_question}/{number_of_questions}","next_button": "Suivante"}
You should see the translations once you click the start button and start the quiz.
Now, here’s a problem. Anytime we want to add new strings to the French dictionary, we have to copy the keys to the file. Also, when we want to add a new locale, we’ll have to create it ourselves and fill in the translations. Imagine doing this process when your app has many strings and locales. Sure, using ChatGPT and other AI tools can help you generate the keys for every locale, but things become harder to change and track if you add more strings.
Automating some of these processes will make things faster, and this is where Crowdin comes in.
Automating Localization with Crowdin
Crowdin is a cloud-based localization management software. Crowdin uses continuous localization and automation to enable developers and translators to localize software with less friction, allowing translation and development to go on at the same time. Crowdin’s editor is user-friendly and it allows developers to give translators context so they have all the information they need to put in the right translations.
With Crowdin, developers can upload their translations and invite translators to collaborate on a project. Once the translators are done, they can use Crowdin’s QA checking features to verify if the translations are correct and then synchronize with the codebase.
So how exactly will Crowdin help us? Well, instead of manually creating files for our locales, we can let Crowdin do that for us. Let’s add Crowdin to the project.
Schedule a free demo with our manager to Learn how to optimize your content localization
Setting up Crowdin
Follow these steps to set up Crowdin:
- Create a free Crowdin account.
- Click the
+button to create a new project. - Give your project a name, and make your project “Private” or “Public”.
- Set English as the source language and French as the target language, then click “Create Project”.
We’ll use Crowdin’s GitHub integration to upload our source file (en.json) for translation so Crowdin can stay in sync with our project. Crowdin supports other VCS (version control systems) and has many integrations. You can check them out in the Crowdin store.
To connect Crowdin to GitHub:
- Go to the Integrations tab.
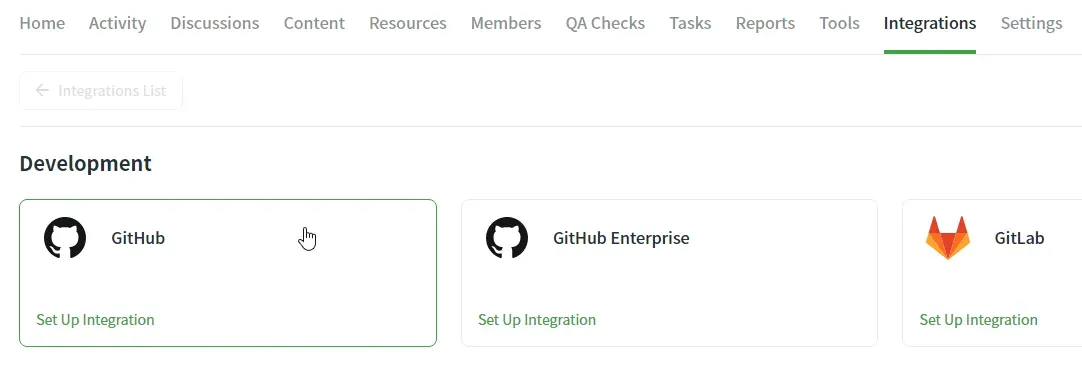
- Select GitHub.
- Select the “Set up integration” button and click “Source and translation files mode”
- Give Crowdin access to your GitHub account.
Once you grant access to Crowdin, you’ll need to setup the app’s repository for localization. Follow these steps:
-
Select the app’s repository.
-
Select the branch you want to translate,
mainin this case. Crowdin will create a branch called “l10n_main” in your repository to store the translations. You can give the branch a different name if you like.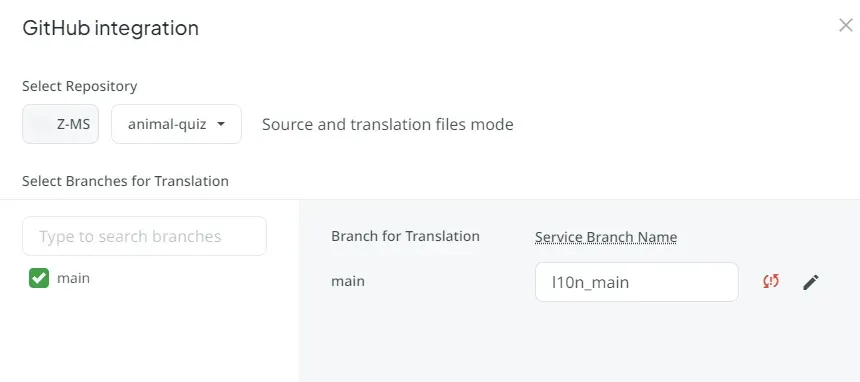
-
Click the pencil icon next to “l10n_main” to edit the configuration.
-
Confirm
crowdin.ymlas the configuration file. -
Enter
/src/locales/en.jsonin the Source files path field. -
Enter
/src/locales/%two_letters_code%.jsonin the Translated files path field. Crowdin uses configuration placeholders like%two_letters_code%to make it easier to match files having locales in their names. In this case, Crowdin will createfr.jsonin thelocalesfolder.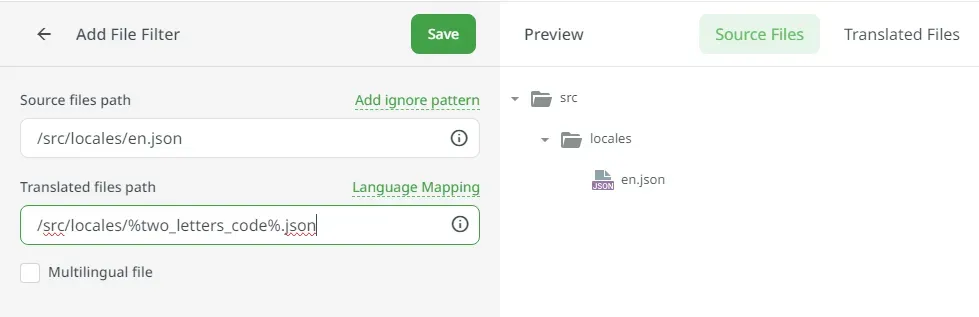
-
Save all the settings.
If you go the dashboard and open en.json in the editor, you’ll see the files and strings we translated earlier. 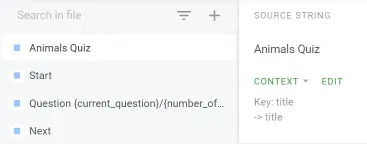
Now that we’ve connected Crowdin to the app, let’s continue with our translations.
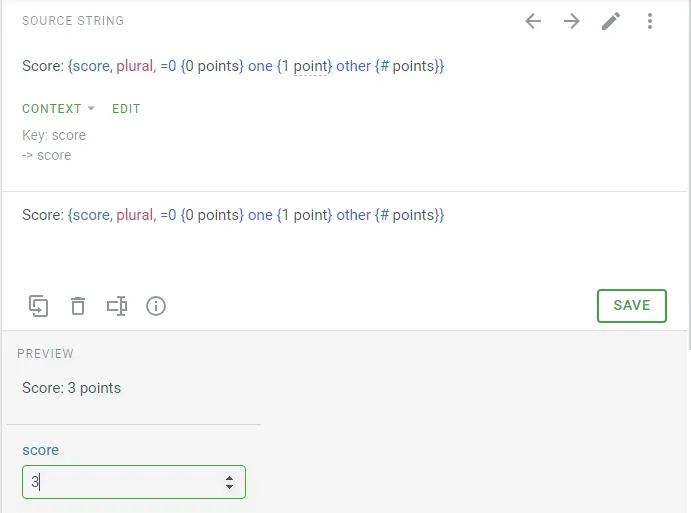
Dealing with Plurals
Let’s localize the score counter. It contains the user’s score and the string “points”. 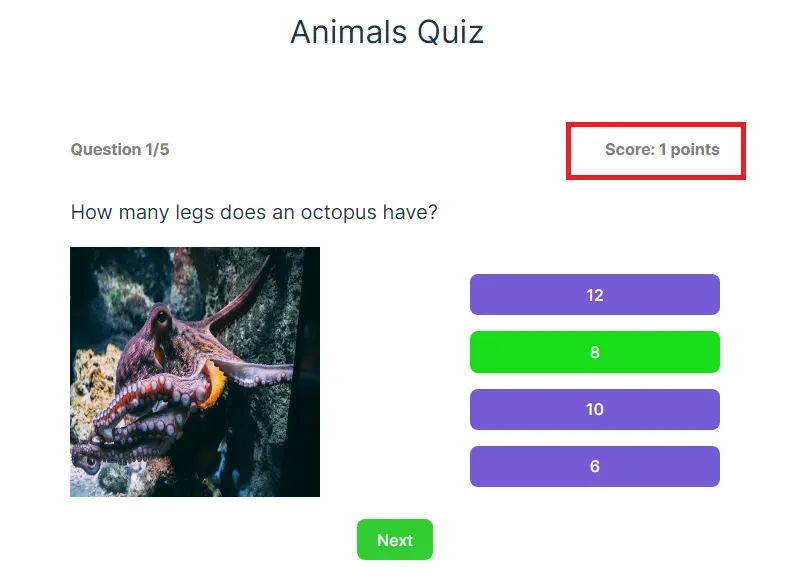
The score currently displays “1 points”, which isn’t correct in English. We could use JavaScript logic to handle the plurals problem, but it won’t scale as we add more locales to the app. Plural handling is a common localization feature and it comes in-built with svelte-i18n.
Follow these steps to localize the score:
-
Mark the score counter for extraction in
QuizContainer.svelte:Changing it from this:
<p>Score: {score} points</p>To this:
<p>{$_("score", { values: { score } })}</p> -
Run the
extractcommand. -
Open
en.jsonand fill in the score key with this code:{"score": "Score: {score, plural, =0 {0 points} one {1 point} other {# points}}"}
We’re using the ICU Message Format to display the plurals. Using the score variable, we set the strings we’ll display for 0 (0 points), 1 (1 point), and other (2 or more points). These are the plural forms of English. Other languages, such as Arabic, have more plural forms than English.
We’ll now head over to Crowdin to translate the plurals. Follow these steps:
-
Commit and push your code to GitHub.
-
Open
en.jsonin your Crowdin dashboard.Once you start translating, you’ll see a preview of how the plural translation looks.
The words for “Score” and “point(s)” are the same in English as in French. Also, French and English have the same plural form, so we’ll just copy and paste the translation. After you’re done translating, click “Save” and click the checkmark below the preview to approve the translations.
-
Click the “Sync” button in the Integrations tab to synchronise Crowdin with your GitHub repository.
-
Go to your GitHub repository and you should see the pull request containing the translations.
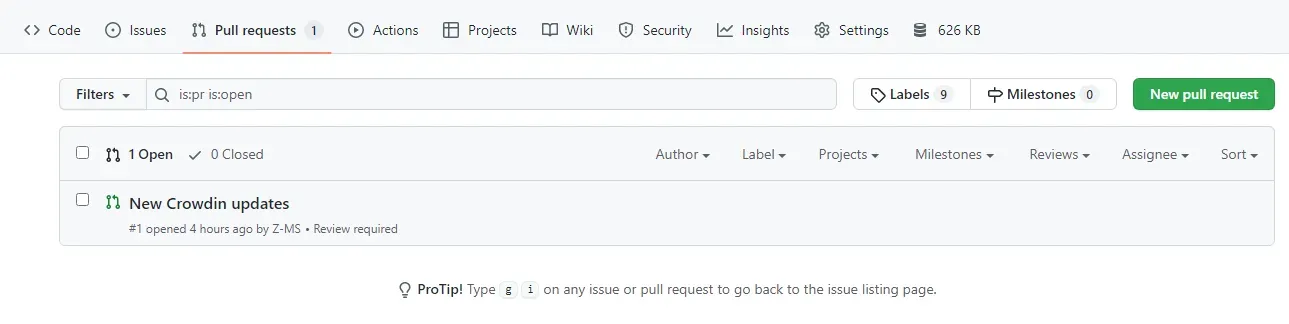
-
Merge the pull request and pull in the changes to your local branch. Everything should work fine if you change the locale in the app.
Locale Switcher
I’m sure you’re tired of changing the locale through code. I am too. We’ll build a locale switcher to make this task easy for us and our users.
To accomplish this, we’ll need a locale switcher component.
-
Create the locale switcher component
src/components/LocaleSwitcher.svelte.<script>import { _, locale } from "svelte-i18n";export let currentLocale = "en";function changeLocale(event) {event.preventDefault();$locale = event.target.value;}</script><div><select value={currentLocale} on:change={changeLocale}><option value="en">{$_('locale_switcher_english')}</option><option value="fr">{$_('locale_switcher_french')}</option></select></div>Notice the
$localevariable we’re using. Svelte-i18n provides us with this store so we can access the current locale. -
Import
LocaleSwitcherinApp.svelte:<script>import { _, isLoading, locale } from "svelte-i18n";import QuizContainer from "./components/QuizContainer.svelte";import LocaleSwitcher from "./components/LocaleSwitcher.svelte";let gameStarted = false;</script>// other markup{#if !gameStarted}<LocaleSwitcher currentLocale={$locale}/>{/if}I put the
LocaleSwitcherin anifblock because I want it to be visible only when the game starts. It would be a bit weird to change the locale in the middle of the game. -
Run the
extractcommand. -
Fill in the strings in
en.json.{"locale_switcher_english": "English","locale_switcher_french": "French"}Since these new keys are short, we can skip using Crowdin to make this quick change.
-
Add the keys in
fr.jsonand fill in the translations:{"locale_switcher_english": "Anglais","locale_switcher_french": "Français"}
You should see the locale switcher in action.

Remember to commit and push your changes to GitHub.
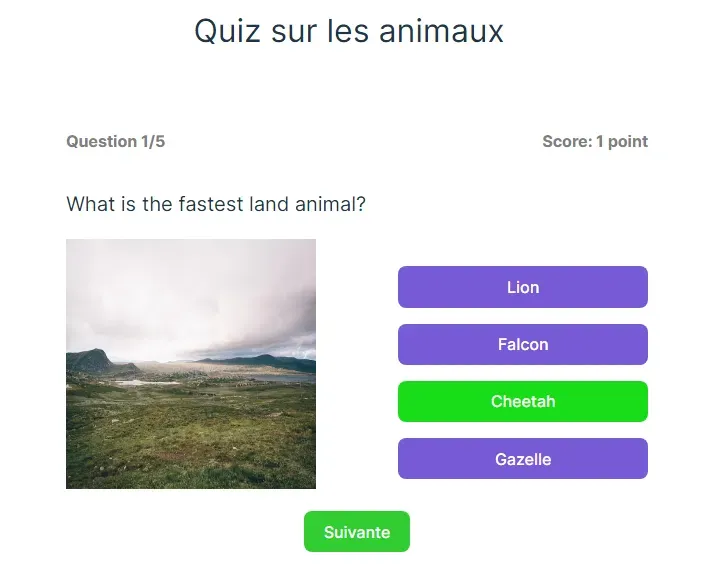
Localize the Questions and Options with Crowdin
The French version of the app currently looks weird because the questions and options are still in English. So let’s change that.
I stored the questions and answers in a JSON file, questions.json:
[ { "question": "All of these animals lay eggs except?", "answer": "Panda", "options": ["Fish", "Chicken", "Crocodile", "Panda"], "imageUrl": "src/assets/nick-fewings-qLlCBkTSYAI-unsplash.jpg", "imageAltText": "Eggs on wood shavings." }, { "question": "What liquid do bees produce?", "answer": "Honey", "options": ["Silk", "Honey", "Web", "Milk"], "imageUrl": "src/assets/damien-tupinier-OFEvgVFr6iU-unsplash.jpg", "imageAltText": "Bees near the entrance of a wooden hive." }]Since we want to translate this file into another locale and to future-proof it for translation into other locales, we should rename the file to questions.en.json. When we upload this file to Crowdin, Crowdin will create the files for other locales using this format (the language in the filename).
-
Rename
questions.jsontoquestions.en.json. -
Import the
localevariable inQuizContainer.svelte.import { _, locale } from "svelte-i18n"; -
Modify the
fetch()call to include the current locale when fetching JSON files.function getQuestions() {let currentLocale = $locale;return fetch(`src/assets/data/questions.${currentLocale}.json`).then((response) =>response.json());}
Follow these steps to upload questions.en.json to Crowdin:
- Go to the Integrations tab.
- Click the “Edit” button above your repository
- Click the Edit icon in the repository settings
- Click “Add a new file filter”.
- Enter
/src/assets/data/questions.en.jsonin the Source files path. - Enter
/src/assets/data/questions.%two_letters_code%.jsonin the Translated files path.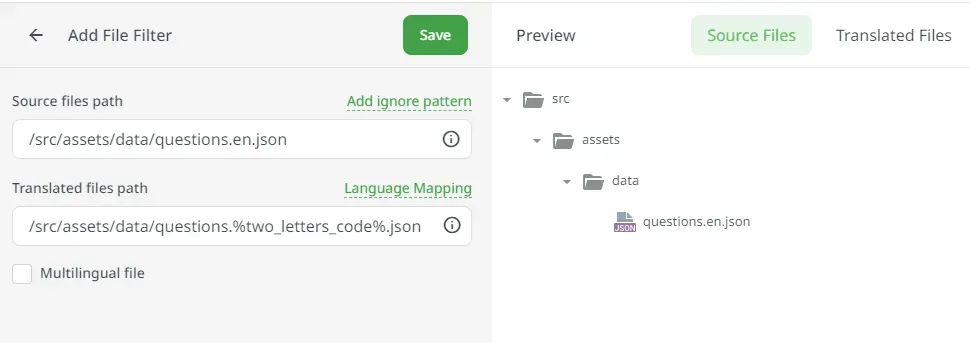
- Save all changes.
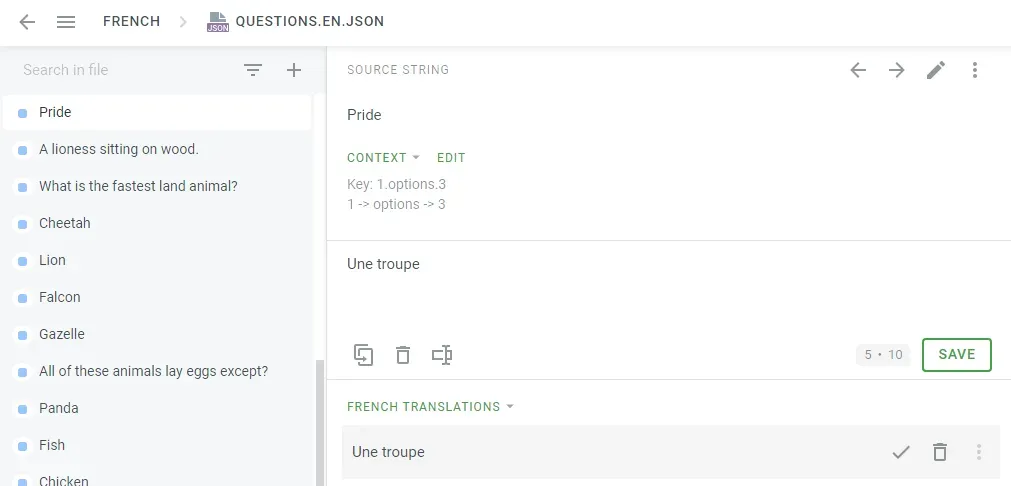
Navigate to the editor and start translating:
- Translate the questions and the image’s alt texts as well.
- For strings you don’t want to translate, like
imageUrl, use the “Hide string” option.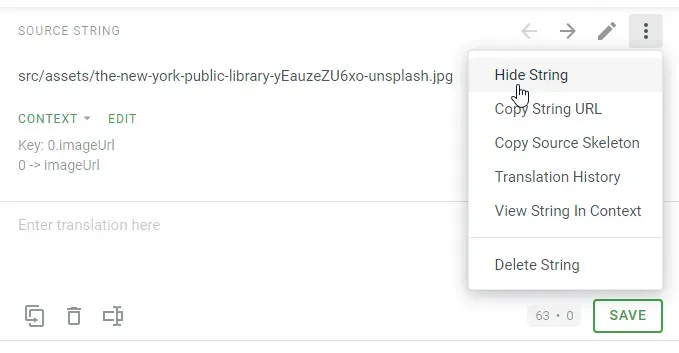
- Save your translations.
- Synchronize your changes in the Integrations tab.
- Merge the pull request in GitHub.
And there you go! A fully localized quiz app.
Conclusion
Svelte-i18n is a simple i18n library, and with it, we were able to start localizing the quiz for a French audience. Using Crowdin, we removed manual processes that caused friction and finished localizing the app.
If you are looking for advanced Enterprise translation management solution for your i18n and l10n needs, check out Crowdin Enterprise!
Here are some resources you might find helpful:
- Quiz app source code
- Svelte-i18n documentation
- Crowdin GitHub documentation
- FormatJS: Basic Internationalization Principles
- Continuous Localization Guide
Zayyad Muhammad Sani
Zayyad Muhammad Sani is a software developer and technical writer. He produces quality technical content by combining his English writing skills and programming experience in JavaScript, Java, Vue.js, and Lingui.