
If you want to sell your game internationally, you need to localize it. However, manual work and strings.xml files are not what modern developers look for.
In this guide, we will skip the theory and go straight to the code of Unity localization process. You will learn how to:
- Set up the official Unity Localization Package (v1.5+).
- Implement runtime language switching with C#.
- Automate the localization workflow with Crowdin and Unity plugin.
If you are looking for the best way to automate your localization workflow, check out our Unity translation plugin to sync your localization tables with your translation project.
Why do you need game localization
Besides multi-platform accessibility, game translation is essential to attract international players and expand your audience. Localized games increase sales, downloads, and App Store ratings.
Read our game localization guide to learn what elements to localize beyond in-game text and how to do it in the most efficient way.
Unity localization package
Unity’s official Unity Localization Package (v1.5+) is the industry standard for implementing localization in Unity projects. Unlike older custom solutions, this package provides a robust, scalable architecture for managing translations, localized assets, and runtime locale switching.
The package is built on Unity’s Addressables system, which means:
- Async loading: All localization operations are non-blocking
- Memory efficient: Only active locale data is loaded into memory
- Scalable: Handles small indie games to AAA titles with thousands of strings
Key components
The unity localization package consists of two primary table types:
1. String tables - Store UI text, dialogue, item descriptions, and any other string content. Each table is a CSV-based asset that maps keys (e.g., menu_title) to translated values for each locale.
2. Asset tables - Store localized assets like textures, audio clips, fonts, and sprites. When you switch locales, the package automatically loads the correct asset variant.
Why this package matters
For developers coming from older localization approaches (JSON files, ScriptableObjects, or custom systems), the Unity Localization Package offers:
- Official Unity support and documentation
- Editor integration with visual table management
- Component-based UI localization (no custom scripts required for basic use)
- Built-in plural rules, Smart Strings (runtime formatting), and pseudolocalization
Setting up Unity localization package
Installing and configuring localization settings
Step 1: Install the package
Open Package Manager (Window → Package Manager), switch to Unity Registry, find Localization, and click Install. For Unity 2022.3+ and Unity 6 (2025/2026), use version 1.5 or later.
Alternatively, add this to your Packages/manifest.json:
{ "dependencies": { "com.unity.localization": "1.5.2" }}Step 2: Create localization settings
Navigate to Edit → Project Settings → Localization. Click Create to generate the Localization Settings asset. This will be saved in Assets/Settings/ by default.
Step 3: Add locales
In the Localization Settings window:
- Click Add Locale
- Select your target languages (e.g., English, Ukrainian, German)
- Set a default locale (usually English)
Each locale you add will become available at runtime via LocalizationSettings.AvailableLocales.
Creating string tables for UI text
String Tables are the foundation of text localization in Unity.
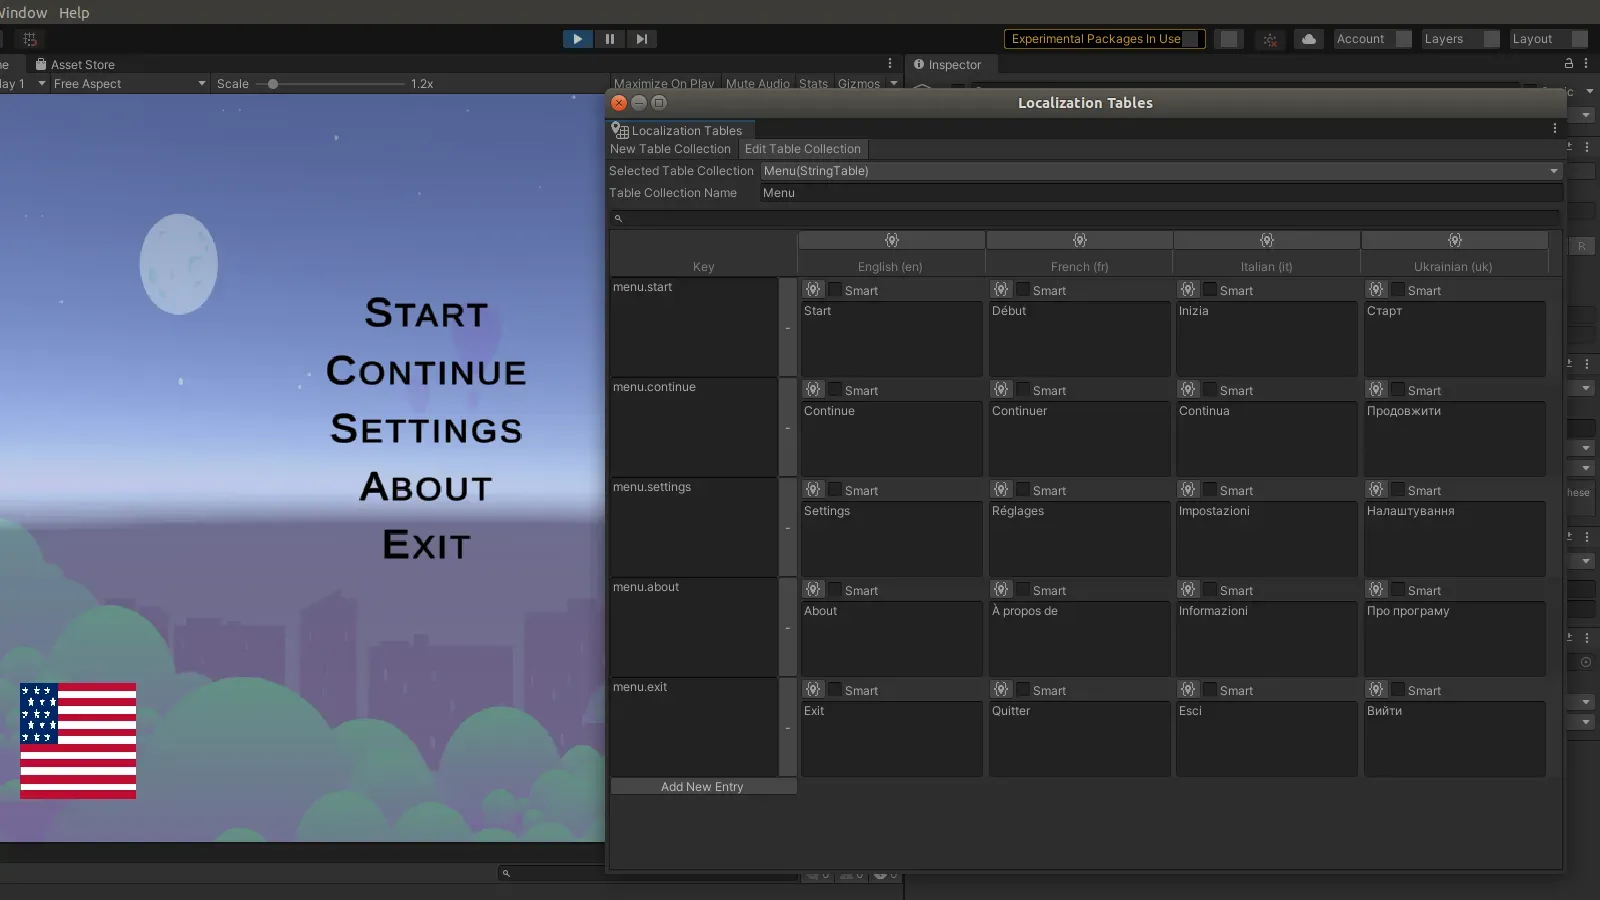
Step 1: Open localization tables window
Go to Window → Asset Management → Localization Tables.
Step 2: Create a string table collection
- Click New Table Collection
- Select String Table Collection
- Name it
UI_Strings(or organize by feature:Menu_Strings,Game_Strings) - Choose a save location (e.g.,
Assets/Localization/String Tables/)
Unity will generate one table asset per locale (e.g., UI_Strings_en.asset, UI_Strings_uk.asset).
Step 3: Add localization keys
In the Localization Tables window, add your keys and translations:
| Key | English (en) | German (de) |
|---|---|---|
| menu_title | Main Menu | Hauptmenü |
| play_button | Play | Spielen |
| settings | Settings | Einstellungen |
| quit | Quit | Beenden |
Click Add New Entry, type the key name, then fill in the translation for each locale column.
Step 4: Use in UI
For TextMeshPro components:
- Add the
LocalizeStringEventcomponent to your TextMeshPro object - In the Inspector, set:
- Table Collection:
UI_Strings - Table Entry:
menu_title
- Table Collection:
The text will automatically update when the active locale changes.
Working with asset tables
Asset Tables handle localized non-text content: images, audio, fonts, prefabs, and more.
Step 1: Create an asset table collection
- In Localization Tables window, click New Table Collection
- Select Asset Table Collection
- Name it
UI_Assets - Save to
Assets/Localization/Asset Tables/
Step 2: Add localized assets
Add entries for each asset you want to localize:
| Key | English (en) | Ukrainian (uk) | German (de) |
|---|---|---|---|
| flag_icon | flag_en.png | flag_uk.png | flag_de.png |
| menu_bg | menu_bg_en.png | menu_bg_uk.png | menu_bg_de.png |
| voice_line | welcome_en.mp3 | welcome_uk.mp3 | welcome_de.mp3 |
Drag your asset files into the appropriate locale column. Unity handles the rest.
Step 3: Load assets in code
Here’s how to load a localized sprite at runtime:
using UnityEngine;using UnityEngine.Localization;using UnityEngine.Localization.Tables;using UnityEngine.UI;
public class LocalizedFlag : MonoBehaviour{    [SerializeField] private Image flagImage;
    async void Start()    {        var assetTable = new LocalizedAssetTable { TableReference = "UI_Assets" };        var spriteHandle = assetTable.GetAssetAsync<Sprite>("flag_icon");
        await spriteHandle.Task;
        if (spriteHandle.Status == UnityEngine.ResourceManagement.AsyncOperations.AsyncOperationStatus.Succeeded)        {            flagImage.sprite = spriteHandle.Result;        }    }}
Why async? The Unity Localization Package uses Addressables, which loads assets asynchronously to avoid frame drops.
Implementing locale switching in Unity
LocaleSelector script - runtime language switching
To give players control over the game language, you need a script that manages locale switching. Here’s a production-ready implementation:
using UnityEngine;using UnityEngine.Localization.Settings;using System.Collections;
public class LocaleSelector : MonoBehaviour{    [SerializeField] private bool autoDetectOnStart = true;
    private void Start()    {        if (autoDetectOnStart)        {            StartCoroutine(AutoDetectLocale());        }    }
    /// <summary>    /// Set locale by ISO code (e.g., "en", "uk", "de")    /// </summary>    public void SetLocale(string localeCode)    {        StartCoroutine(SetLocaleAsync(localeCode));    }
    /// <summary>    /// Set locale by index from Available Locales list    /// </summary>    public void SetLocaleByIndex(int index)    {        var availableLocales = LocalizationSettings.AvailableLocales.Locales;
        if (index < 0 || index >= availableLocales.Count)        {            Debug.LogError($"Invalid locale index: {index}");            return;        }
        StartCoroutine(SetLocaleAsync(availableLocales[index].Identifier.Code));    }
    /// <summary>    /// Cycle to next locale (useful for toggle buttons)    /// </summary>    public void CycleToNextLocale()    {        var availableLocales = LocalizationSettings.AvailableLocales.Locales;        var currentLocale = LocalizationSettings.SelectedLocale;
        int currentIndex = availableLocales.IndexOf(currentLocale);        int nextIndex = (currentIndex + 1) % availableLocales.Count;
        LocalizationSettings.SelectedLocale = availableLocales[nextIndex];    }
    private IEnumerator AutoDetectLocale()    {        yield return LocalizationSettings.InitializationOperation;
        var systemLanguage = Application.systemLanguage;        string targetCode = ConvertSystemLanguageToCode(systemLanguage);
        var availableLocales = LocalizationSettings.AvailableLocales.Locales;        foreach (var locale in availableLocales)        {            if (locale.Identifier.Code == targetCode)            {                LocalizationSettings.SelectedLocale = locale;                yield break;            }        }    }
    private IEnumerator SetLocaleAsync(string localeCode)    {        yield return LocalizationSettings.InitializationOperation;
        var availableLocales = LocalizationSettings.AvailableLocales.Locales;
        foreach (var locale in availableLocales)        {            if (locale.Identifier.Code == localeCode)            {                LocalizationSettings.SelectedLocale = locale;                yield break;            }        }
        Debug.LogError($"Locale '{localeCode}' not found!");    }
    private string ConvertSystemLanguageToCode(SystemLanguage language)    {        return language switch        {            SystemLanguage.English => "en",            SystemLanguage.Ukrainian => "uk",            SystemLanguage.German => "de",            SystemLanguage.French => "fr",            SystemLanguage.Spanish => "es",            SystemLanguage.Italian => "it",            SystemLanguage.Japanese => "ja",            SystemLanguage.Korean => "ko",            SystemLanguage.Chinese => "zh",            SystemLanguage.Russian => "ru",            SystemLanguage.Polish => "pl",            SystemLanguage.Portuguese => "pt",            SystemLanguage.Arabic => "ar",            _ => "en"        };    }}
Key features:
- Auto-detection: Reads the player’s system language and sets the matching locale
- Async initialization: Waits for
LocalizationSettingsto load before switching locales - Multiple APIs: Switch by ISO code, index, or cycle through all locales
- Error handling: Logs warnings if a requested locale does not exist
Integrating with UI components
Dropdown menu example:
using UnityEngine;using TMPro;
public class LanguageDropdown : MonoBehaviour{    private LocaleSelector selector;    private TMP_Dropdown dropdown;
    void Start()    {        selector = FindObjectOfType<LocaleSelector>();        dropdown = GetComponent<TMP_Dropdown>();
        var locales = UnityEngine.Localization.Settings.LocalizationSettings            .AvailableLocales.Locales;
        dropdown.options.Clear();        foreach (var locale in locales)        {            dropdown.options.Add(new TMP_Dropdown.OptionData(locale.name));        }
        dropdown.onValueChanged.AddListener(selector.SetLocaleByIndex);    }}
Simple toggle button:
using UnityEngine;using UnityEngine.UI;
public class LanguageToggle : MonoBehaviour{    void Start()    {        var selector = FindObjectOfType<LocaleSelector>();        GetComponent<Button>().onClick.AddListener(selector.CycleToNextLocale);    }}
When LocalizationSettings.SelectedLocale changes, all LocalizeStringEvent and LocalizeTextureEvent components receive an update event and refresh their content automatically.
Automate the workflow with Crowdin
Manual localization workflows are prone to errors: exporting CSV files, emailing translators, manually importing translations, version conflicts. The Crowdin Plugin for Unity solves this by syncing your Unity Localization Package tables directly with a Translation Management System (TMS).
What the plugin does:
- Push: Uploads String Tables and Asset Tables from Unity to Crowdin as CSV files and asset folders
- Pull: Downloads completed translations from Crowdin and updates your Unity tables
- Context: Sends screenshots with tagged strings to help translators understand where text appears
The plugin works specifically with the Unity Localization Package table format. If you are using a custom localization system, you will need to migrate to Unity’s official package first.
Why Crowdin?
Crowdin is a leading game localization solution with:
- Advanced AI, QA and collaboration features
- 700+ integrations with developer, design, marketing and project management tools
- 40+ Machine translation integrations for pre-translation
- Access to professional translation agencies via Crowdin Vendor Marketplace
- Version control for localization files
For Unity developers, the key advantage is automation: no more manual CSV exports, no file versioning issues, and translators work in a web interface with context instead of raw CSV files.
Localize your product with Crowdin
Connecting Crowdin plugin to Unity
Prerequisites and setup
Before connecting, make sure you have:
- Unity Localization Package installed
- At least one String Table Collection created
- A Crowdin account (free tier available)
- A localization project created in Crowdin
Generate a personal access token:
- Log in to Crowdin
- Go to Account Settings → API
- Click New Token
- Name it (e.g., “Unity Project Token”)
- Copy the token (you will need it in Unity)
Connecting Unity to Crowdin
Step 1: Install the Crowdin Unity plugin
Download and install the plugin from the Unity Asset Store or Unity Package Manager.
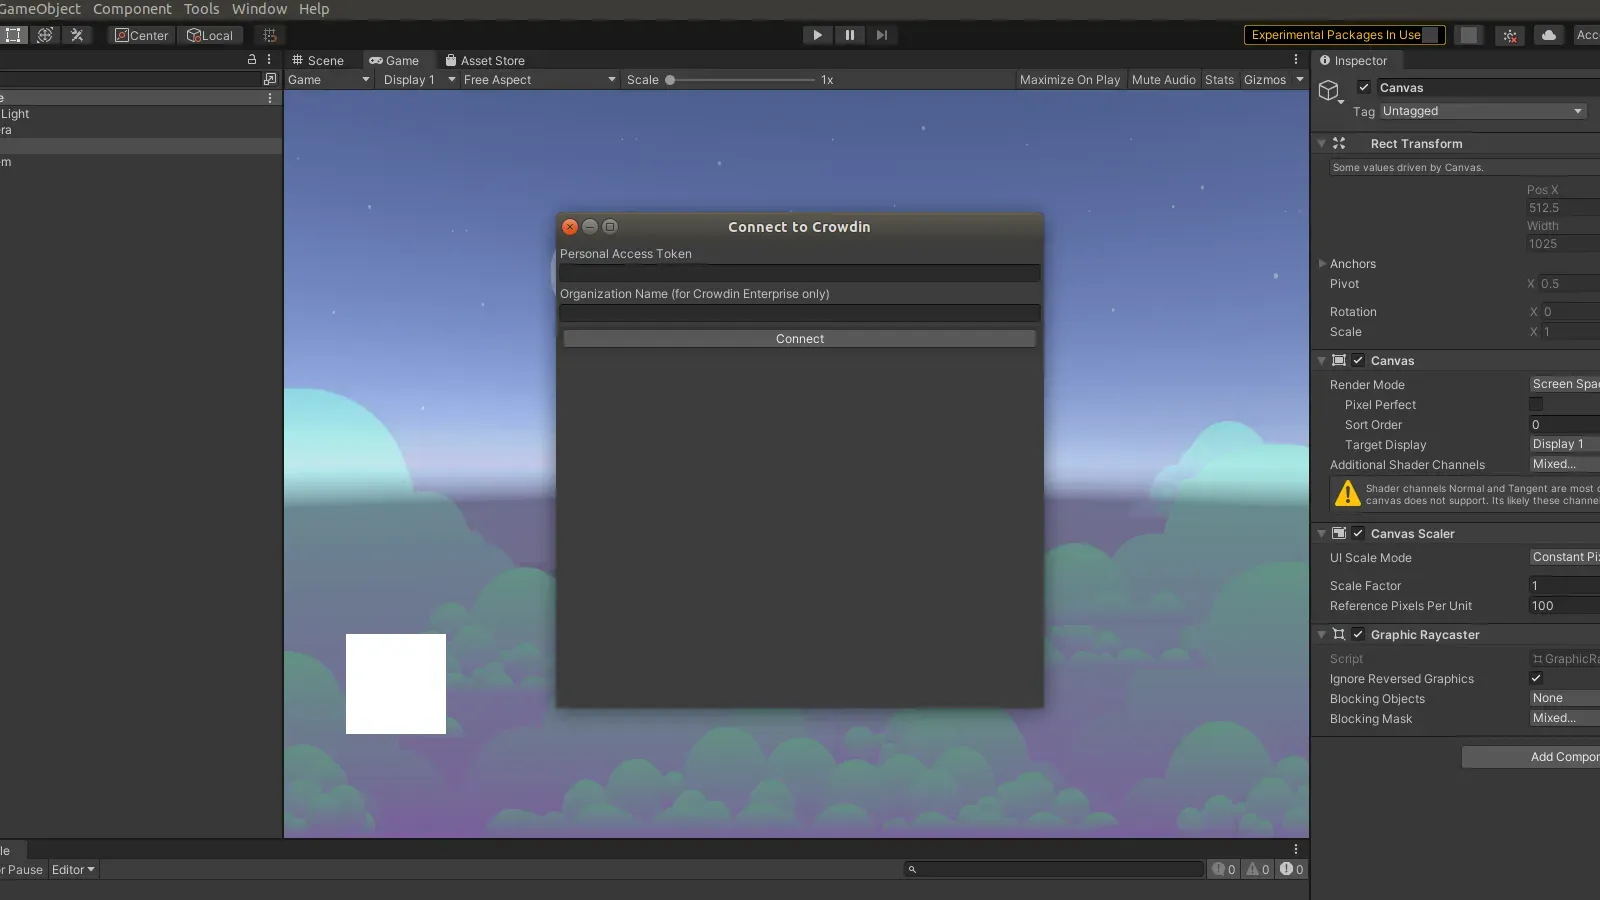
Step 2: Connect to Crowdin
In Unity, go to Tools → Crowdin → Connect to Crowdin
Enter:
- Organization Domain (for Crowdin Enterprise) or leave empty for Crowdin.com
- Personal Access Token (from previous step)
- Choose the Project
Click Connect. If successful, you will see a confirmation message.
Syncing content between Unity and Crowdin
Pushing source strings and assets to Crowdin
Once connected, upload your localization tables to Crowdin:
For string tables:
Tools → Crowdin → Push Strings to Crowdin
This converts each String Table Collection into a CSV file in your Crowdin project. For example:
UI_Strings→UI_Strings.csvMenu_Strings→Menu_Strings.csv
The CSV structure preserves your key names and source language text.
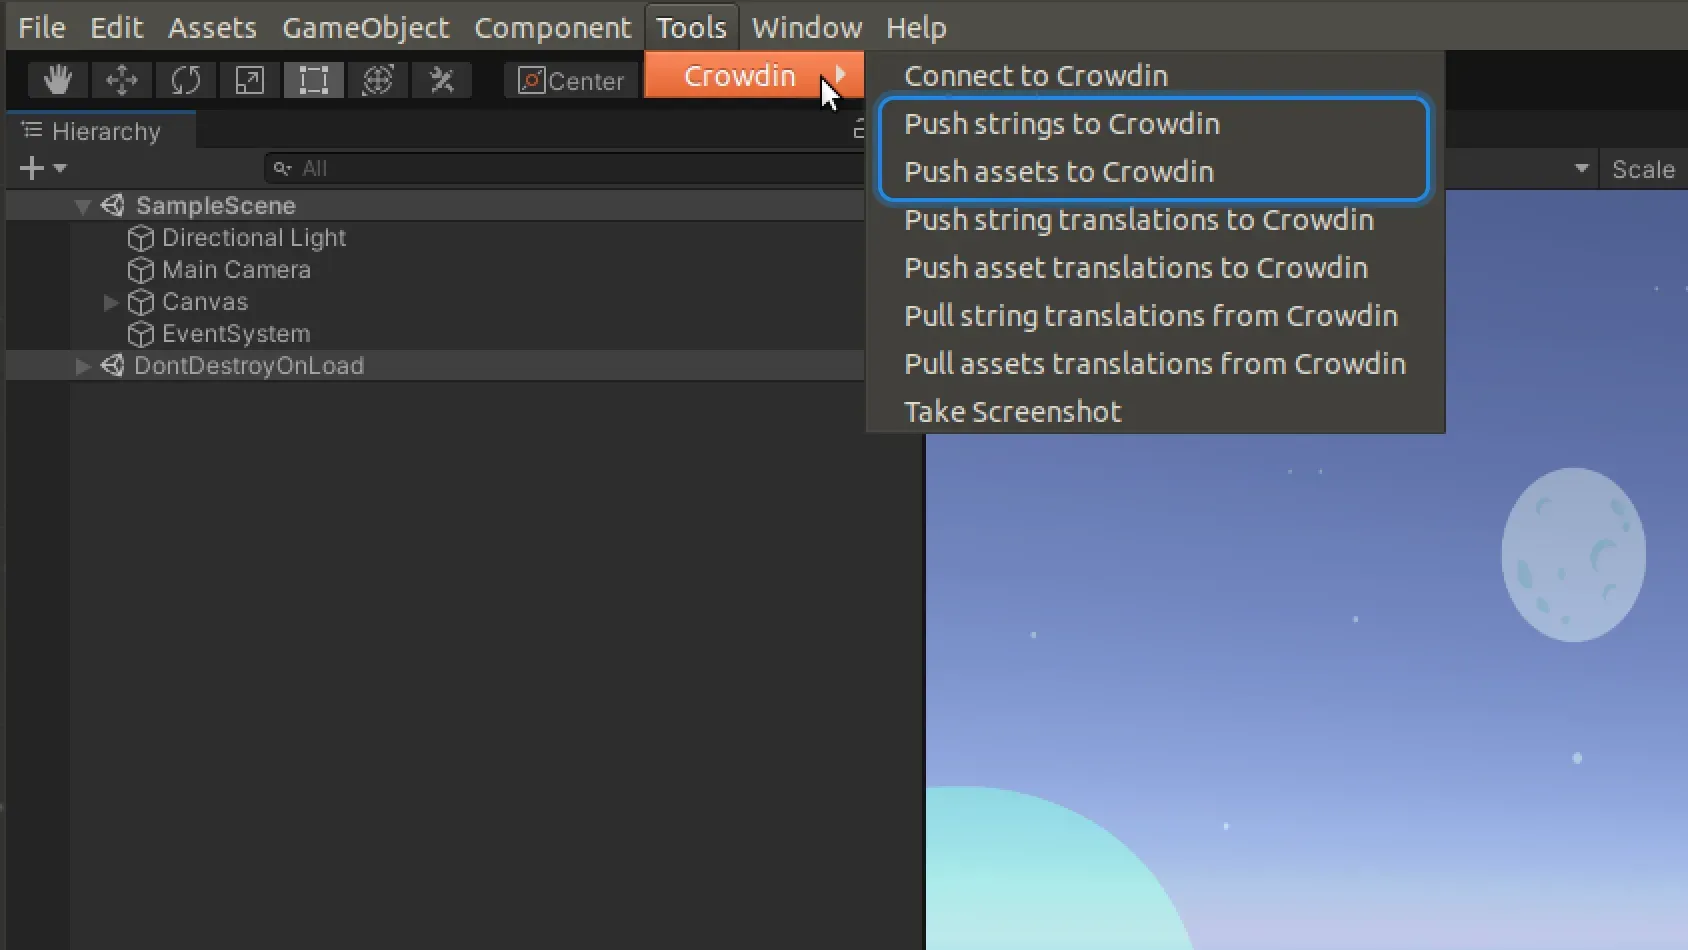
For asset tables:
Tools → Crowdin → Push Assets to Crowdin
Each Asset Table creates a folder in Crowdin with the localized file variants. For example:
UI_Assets/ flag_icon/ en/flag_en.png uk/flag_uk.png de/flag_de.png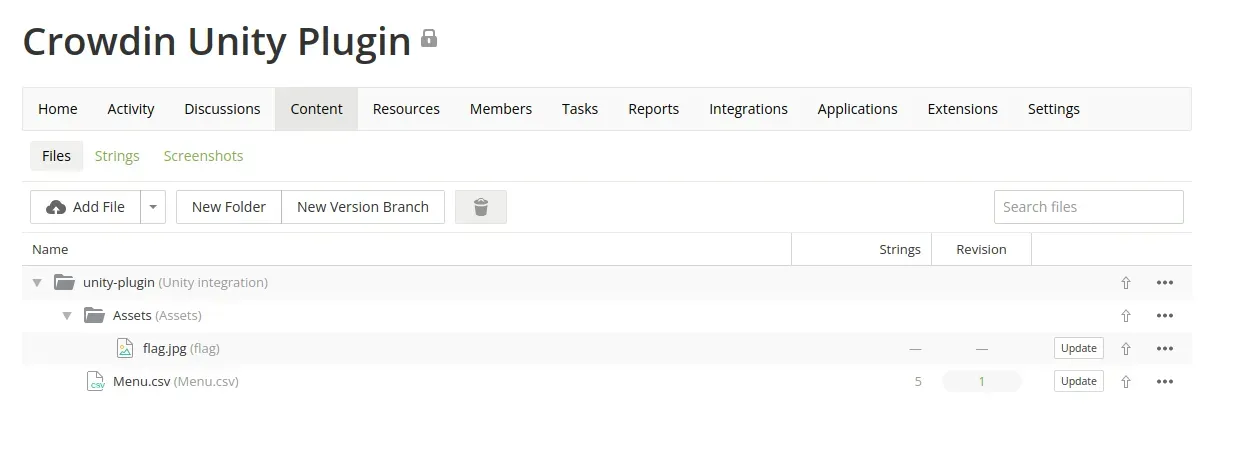
Optional: Push existing translations
If you already have translations in your Unity tables (from a previous system), use:
Tools → Crowdin → Push String/Asset Translations to Crowdin
This uploads both source and existing translations, populating Crowdin’s Translation Memory.
Pulling completed translations from Crowdin
After your translators complete their work in Crowdin:
Tools → Crowdin → Pull String/Asset Translations from Crowdin
This downloads all translations and updates your Unity Localization tables. If a translation is missing, Unity will display the source language text as a fallback.

Recommended workflow:
- Push source content after each major update
- Translators work in Crowdin (web interface)
- Pull translations before builds
- Test in Unity Editor by switching locales
The plugin handles all file conversions automatically. You never touch CSV files manually.
Testing localization Unity projects
After setting up your localization tables and integrating Crowdin, test your implementation:
In Unity Editor:
- Press Play
- Use your
LocaleSelectorto switch languages - Verify that all UI text updates correctly
- Check that localized assets (images, audio) load
Example test code:
void Update(){ if (Input.GetKeyDown(KeyCode.E)) SetLocale("en"); if (Input.GetKeyDown(KeyCode.U)) SetLocale("uk"); if (Input.GetKeyDown(KeyCode.G)) SetLocale("de");}On target platforms:
Build your game for Android or iOS and test:
- Auto-detection: Does the game default to the device’s system language?
- Manual switching: Does the language selector work?
- Text expansion: Does German text (typically 30% longer than English) fit in your UI?
- RTL languages: If supporting Arabic or Hebrew, test text direction
Common issues:
- Strings not updating: Make sure your UI components use
LocalizeStringEvent, not static text - Missing translations: Check that you pulled the latest translations from Crowdin
- Performance: Large Asset Tables may cause loading delays; enable async loading indicators
Unity localization best practices
1. Organize tables by feature
Instead of one giant Strings table:
Menu_Strings (main menu, settings)Game_Strings (HUD, tooltips, item names)Dialogue_Strings (NPC conversations)Tutorial_Strings (onboarding, hints)This keeps tables manageable and allows you to load only relevant tables per scene.
2. Use smart strings for dynamic content
Smart Strings support runtime variable injection:
In string table:
level_complete: "Level {0} Complete!"score_display: "Score: {0:N0}"In code:
var localizedString = new LocalizedString("Game_Strings", "level_complete");localizedString.Arguments = new object[] { currentLevel };text.text = localizedString.GetLocalizedString();This avoids creating separate keys for “Level 1 Complete”, “Level 2 Complete”, etc.
3. Plan for text expansion
Different languages have different text lengths. Design your UI with flexible layouts (TextMeshPro auto-sizing, anchors) to handle expansion:
- German: +30% vs English
- Russian: +15% vs English
- Japanese: -10% vs English (but requires larger fonts for readability)
4. Preload critical tables
For performance-sensitive scenarios (e.g., loading screens), preload tables:
In Localization Settings, enable Preload All Tables or selectively preload specific tables via code:
var tableOp = LocalizationSettings.StringDatabase.PreloadTables( new TableReference[] { "Menu_Strings", "Game_Strings" });await tableOp.Task;5. Test with pseudolocalization
Unity’s Localization Package includes a pseudolocalization feature. Enable it in Localization Settings to generate a fake locale that:
- Adds accented characters (Ṫëṡẗ → helps spot font issues)
- Expands text length (simulates German)
- Wraps text in brackets (helps spot hardcoded strings)
Add a Pseudo (ps) locale and test your game with it before sending to translators.
Enterprise-level game localization
Depending on the scale of your project, team, and needs, you can choose between Crowdin and Crowdin Enterprise.
Crowdin Enterprise is designed for studios with multiple projects, large teams, and complex workflows. Key features:
Summing up
Unity localization is no longer about manually exporting CSV files and emailing translators. With the Unity Localization Package and Crowdin integration, you get:
- Official, well-supported localization architecture
- Automatic UI updates when locales change
- Async asset loading for performance
- Direct sync between Unity tables and Crowdin’s translation platform
By following the discussed workflow, you will ship localized games faster, reduce translation errors, and reach players in their native languages.
Ready to get started? Try the Crowdin Unity Plugin and automate your localization workflow today.
Localize Your Game with #1 Solution
Frequently asked questions
How do I localize a Unity game?
To localize a Unity game:
- Install the Unity Localization Package via Package Manager (
Window → Package Manager → Localization) - Create Localization Settings (
Edit → Project Settings → Localization → Create) - Add target locales (e.g., English, German, Ukrainian)
- Create String Table Collections for UI text (
Window → Asset Management → Localization Tables) - Create Asset Table Collections for localized images, audio, and other assets
- Add
LocalizeStringEventcomponents to your UI text elements - Implement a locale selector script to allow players to change languages at runtime
- Connect to Crowdin to automate translation workflows
The Unity Localization Package uses Addressables for async loading, automatically updates UI when locales change, and supports Smart Strings for dynamic content.
How do I auto translate a game in Unity?
To auto-translate your Unity game:
- Set up the Unity Localization Package with String and Asset Tables
- Install the Crowdin Unity Plugin
- Connect Unity to your Crowdin project via Tools → Crowdin → Connect to Crowdin
- Push source content: Tools → Crowdin → Push Strings to Crowdin
- In Crowdin, enable Pre-Translation with machine translation engines (Google Translate, DeepL, Microsoft Translator, or Amazon Translate)
- Configure translation memory (TM) to reuse previous translations automatically
- Pull completed translations: Tools → Crowdin → Pull Translations from Crowdin
Note: While machine translation is useful for prototyping or internal builds, always use professional translators for player-facing content to ensure quality and cultural appropriateness.
What is the difference between transform and translate in Unity?
This is a common confusion, but these are completely different concepts:
Transform - A component that defines an object’s position, rotation, and scale in 3D/2D space. Every GameObject in Unity has a Transform component. Example:
transform.position = new Vector3(10, 0, 0); // Move object to coordinates (10, 0, 0)transform.Rotate(0, 90, 0); // Rotate 90 degrees on Y-axisTranslate - The process of converting text and content from one language to another. In Unity localization, “translate” refers to translating strings like “Play” → “Spielen” (German).
Diana Voroniak
Diana Voroniak has been in the localization industry for over 4 years and currently leads a marketing team at Crowdin. She brings a unique perspective to the localization with her background as a translator. Her professional focus is on driving strategic growth through content, SEO, partnerships, and international events. She celebrates milestones, redesigns platforms, and spoils her dog and cat.